STAGE 1: How to set-up Zero 2 Pro (3/4): Boot from EMMC, official Linux image
You got your stuff - now how to get Linux up and running from EMMC
5/11/20243 min read
Step 3 of our guide on setting up your Radxa Zero 2 Pro.
EMMC is faster than the SDCard and also free's up the SDCard slot to use for extra memory if you want (although probably better to attach a usb-c SSD or memory stick.
We hope you find the guides useful. Feedback most appreciated.
See How to set-up Zero 2 Pro (1/4): What you need ? and make sure you have all you need. Once they are completed … you also are going to need a PC ! We tried repeatedly to burn the EMMC from Mac's and Linux devices but could not get it to work. Only using a PC and Rufus worked !
1) Get the files you need onto a PC running Windows
Download the os image (in this case the offical radxa os): https://docs.radxa.com/en/zero/zero2pro/getting-started/download#:~:text=Radxa%20ZERO%202%20PRO%20Debian%20Build%2032
Download Rufus [https://rufus.ie/en/]. The menus is a big more daunting but the default settings are the ones to use. It’s interface is also a bit illogical.
Go to the download pages on the Radxa official site for the Radxa Zero 2 Pro and download and install Zadig and RZ USB Boot Helper
Download radxa-zero2-2pro-erase-emmc.bin from the same page
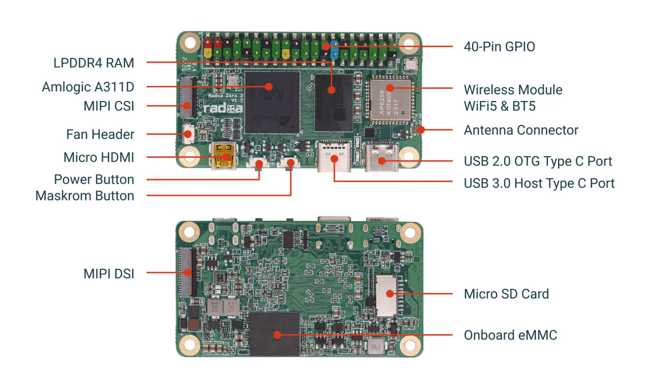
2) Prepare the PC and Radxa Zero 2 Pro - Hold the middle button down (not the one next to the micoHDMI socket) and whilst holding it down, connect the Radxa Zero 2 Pro (use the usb-c socket next to the corner) to your PC. Once connected you can let go of the button and start to prepare the PC and device for the installation.
This puts the Radxa Zero 2 Pro into bootmask mode, basically allowing you to write over the EMMC.
Nothing will happen and the redlight will show inside the Radxa Zero 2 Pro
Open Zadig to install a driver to enable the PC to recognise the Radxa Zero 2 Pro
Options -> List all Devices -> GX-Chip
If GX-Chip isn't showing you did not successfully put the Radxa Zero 2 Pro in bootmask mode, so disconnect it and try again.
Now select a Driver (weirdly this is from the the list box next to the box showing the Driver ... you need to find libusb-win32(v ....). Select that.
If you did it correctly then USB ID will show 1BBE C003
With that all showing click Replace Driver or Install Driver button - the message changes if it already tried once.
Sit back for 2 mins whilst the driver is installed.
Once installed, close Zadig.
Now open RZ_USB_Boot_Helper_V...
Click select and up pops a navigation window to your files. Find and double-click on "factory-loader" (which is installed when you installed the Boot_Helper).
Now click Select again (yes I know this is weird)
Now naigate and find the file called radxa-zero2-2pro-erase-emmc.bin which you downloaded from Radxa.
Double-click on it, which should take you back to the main window.
Be aware that the next step will wipe the contents of your device so make sure you don't care about any data on there before you do this.
Now click Run and the will see the EMMC getting wiped clean.
Once finished close RZ_USB_Boot_Helper_V...
Congratulations, you can now write the OS of your choice to the Radxa Zero 2 Pro.
3) Burn the OS to the EMMC
Open Rufus (leave the Radxa Zero 2 Pro connected).
Select it from the “Device” pull-down list (be careful you pick the right device else you can eaisly wipe your PC).
Click SELECT and use the pull-down to navigate to the OS image you want to write to the Radxa Zero 2 Pro. Ok that.
Then leave the rest of the settings alone and click START. Go have a coffee this is going to take some time like 10 mins or so (can be faster for smaller OS images).
Once it is finished you can disconnect your Radxa Zero 2 Pro - it is done.
No you can set up your Radxa Zero 2 Pro with a mouse, keyboard and screen and switch it on and the OS will boot (you need to go through the set up procedure which is guided). Your OS is installed on the EMMC.
See our previous guide to set up wireless and remove the annoying alerts.
But if you want a much cooler version of Linux which runs super fast and are not afraid of typing in some commands into CLI then see our next guide ...
Support
Connect
contact@bestsbcnow.com
All information on this site is provided as is. Use at your own risk.
© 2024. All rights reserved.