STAGE 1: How to set-up Zero 2 Pro (2/4): Boot from SD Card, official Linux image
You got your stuff - now how to get Linux up and running + Wifi ...
5/10/20243 min read
Step 2 of our guide on setting up your Radxa Zero 2 Pro.
Our aim is to set up these massively powerful devices for either desktop replacement work, software development or robotics.
We hope you find the guides useful. Feedback most appreciated.
As per the previous article we found this version to be incredibly annoying when it comes to continuous alerts. That said the repository of documents from Radxa is valuable and mostly only relevant for this Linux image. So we have included at the end of this post a way to disable some of the annoying messages.
See How to set-up Zero 2 Pro (1/4): What you need ? and make sure you have all you need. Once they are completed …
1) Load the OS onto an SDCard
Download the image: https://docs.radxa.com/en/zero/zero2pro/getting-started/download#:~:text=Radxa%20ZERO%202%20PRO%20Debian%20Build%2032
Now you need to flash the OS to the card:
For Mac and Linux we used BalenaEtcher [https://etcher.balena.io/#download-etcher]. Super simple process, just select the right media (the SD card), and flash it. Done.
For PC we used Rufus [https://rufus.ie/en/]. The menus is a big more daunting but the default settings are the ones to use. It’s also a bit illogical. Basically instal it, make sure you select the SDCard from the “Device” pull-down, then click SELECT and use the pull-down to navigate to the OS image. Ok that. Then leave the rest of the settings alone and click START. Go have a coffee.
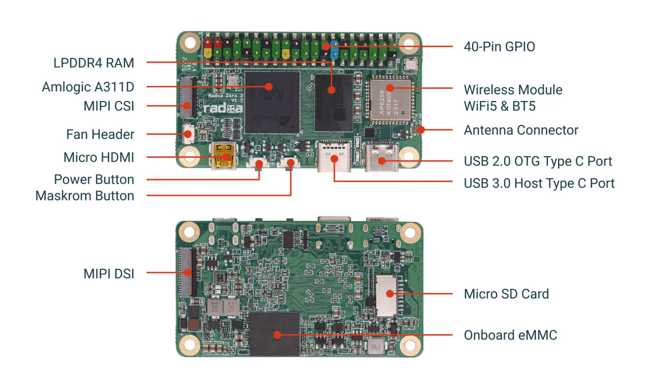
2) Eject the SDCard, plug it into the Radxa Zero 2 Pro and connect the power to it.
Connect the power to the USB-C socket in the corner (far right hand side). The device should spring into life and boot you into KDE Plasma desktop.
You may need to input a few set-up features like locale etc.
Default username and password seems to be radxa and radxa.
You probably want to change the default password from radxa and maybe also set up a new user for yourself.
3) Set up Wifi / Ethernet
Click on System -> System Settings -> Connections, the + symbol at the bottom
Select either Wifi or Ethernet
For Wifi you need only add your SSID (Wifi tab of the connection).
For Ethernet you can connect with a dynamically assigned IP (just add the connection and it will work) or static (select the IPv4 tab, set Method to Manual and Add a unique IP address sub to your router). If your router is on 162.105.245.XXX then copy that IP and add a unique number up to 255 for XXX. Add the 255.255.255.0 Netmask and add (no need to put a Gateway). Note that inputting the IP addresses is very glitchy and it is easy to not save the entries.
4) How to remove some of the annoying alerts
Welcome to the world of polkit !
So you want to run the official Linux version, then you either need to put up with constant alerts requiring actions or you need to start to code some polkit rules which once set remove alerts which relate to these rules. We are not going to condone this approach as the alerts are there for a reason, but if you want to remove them from annoying you, this is how to you about it.
When an alert pops up it will have an id ... something like "org.freedesktop.NetworkManager.wifi.scan" or "org.freedesktop.NetworkManager.network-control" or "org.freedesktop.NetworkManager.settings.modify.system". There seem to be many different types, but these are the most annoying. Each one needs a rule. With the rule in place, the alert will not appear.
cd /etc/polkit-1
sudo -s
cd rules.d
sudo nano FILENAME.rules
Replace FILENAME with with a suitable name relating to the rule you want to write ... for instance to disable the org.freedesktop.NetworkManager.wifi.scan alert we used "allow-network-scans.rules". The FILENAME must end in .rules.
Use the editor to input the following rule:
polkit.addRule(function(action, subject) {
if (action.id == "alert-text-ID-here" && subject.user == "your-username-here") {
return polkit.Result.YES;
}
});
Replace alert-text-ID-here with the alert ID, for instance org.freedesktop.NetworkManager.wifi.scan and replace your-username-here with the user login name that you want the rule to apply to. Your inputs need to have quotes around them. Note if you did not setup a username for yourself, then "radxa" is the username to use.
sudo systemctl restart polkit
You will need to do a separate file for each rule you set up (i.e. for each type of alert). It is very annoying and for this reason the next but one blog will show you how to set up the super fact minimal Armbian image
Support
Connect
contact@bestsbcnow.com
All information on this site is provided as is. Use at your own risk.
© 2024. All rights reserved.